Sunday, December 22, 2013

a break

I know I only post ever 2-3 days (sometimes a little longer), but I will be taking a break till the new year.  I will be in and out of the kitchen way too much to paint & remove each time.  It would be fun doing all those paint jobs, but only having it on while I sleep seems like a waste.  Plus, it will give my nails a much needed break from chemicals & polish.  I'm not even sure I will be painting my nails for Christmas dinner!  I am making warm sticky toffee pudding (among many other things) and that will have to be done during dinner.

Happy Holidays to all! And see you in 2014!

Tuesday, December 17, 2013

peppermint candies

This paint job isn't so obvious as a red & white striped candy cane paint job.  But it does remind me of peppermint candies.  Just a base coat and a dotting tool, easy and done.  Yes the dots are a bit off and not perfect but that is what I was going for.

It's the time of year when I start stirring my hot chocolate with candy canes.  Have you tried that?  It is amazing.  Peppermint hot chocolate is wicked good.  I also keep the cinnamon next to my hot chocolate mix.  When I'm not craving peppermint I add a dash of cinnamon to the drink.  It is great and makes the hot chocolate (no matter how cheap or expensive your mix is) taste great.

OPI - Got The Blues For Red
Wet & Wild - French White Creme (side note - this is a 99 cent polish and it lives up to that price, it is thin and the coverage is awful, the brush is not cut correctly, but it was only 99 cents so I can't really be that mad)

Wednesday, December 11, 2013

preppy argyle

Argyle nails!  So preppy.  They look like golf pants!
This was my first attempt at argyle so they are far from perfect.  This paint job takes a while.  Each layer has to be totally dry before continuing.  Start with the base color (1-3 coats depending on coverage).  Let dry.  Paint on the diamonds.  I used three colors but this could be done with one or two.  Let dry.  Paint on the over stripes.  Let dry.

Some tips/tricks I will use next time I try this paint job:
*use a sharpie to do the over stripes, it will help make perfect stripes
*take time to do each step
*use a dotting tool to dot on the four corners of the diamonds, will help alignment and spacing

Wet & Wild - I Need A Refresh-Mint, On a Trip, French White
Sally Hansen - Celeb City
Sinful Colors - Dream On

Saturday, December 7, 2013

purple & gold

This is an odd purple for me.  It is much more of a warm purple (red undertones) than I normally use.  But it really works with gold.  Add some gold glitter to the tips and a full gold nail, presto - complete look.  Nothing fancy and very easy.

OPI - GoldenEye, Suzi & the 7 Dusseldorfs

Tuesday, December 3, 2013

teal tips

Super short nails can still rock a colored tip.  It gives the illusion of a longer nail.  Such an easy look.  No extra brushes needed.  Just do the base colors.  Let dry and a quick swipe of the opposite color just on the tips.  Done.  Yes, the lines are not perfectly straight but it still works.

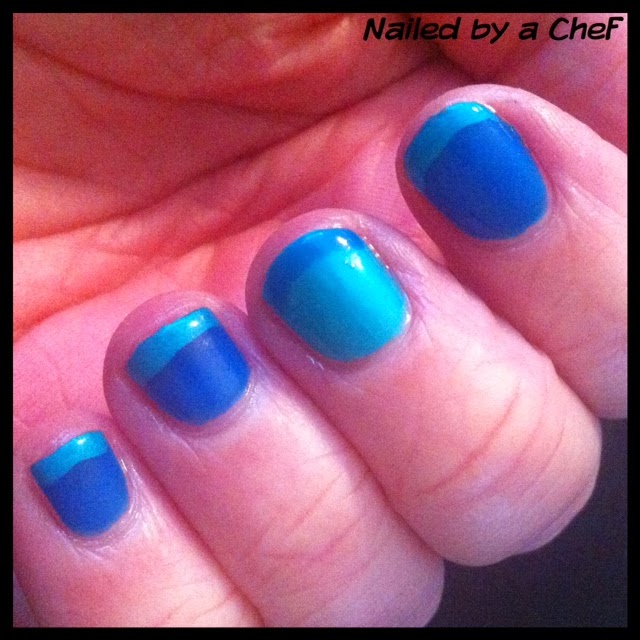
LA Brites - Flash Freeze
China Glaze - Turned Up Turquoise

Saturday, November 30, 2013

dip-n-dots

Dots!  The hardest part about this paint job was finding three polishes that work well together.
No explanation really needed, just three colors, flip flop on one of the accent nails.  Add some dots, done.  This would be a great paint job in black, white, and silver.  Very New Year's Eve-ish.

Sally Hansen - Mint Sorbet
Wet & Wild - I Need A Refresh-Mint
OPI - Do You Lilac It?

Wednesday, November 27, 2013

happy thanksgiving

Happy Thanksgiving!  Hope everyone has a great day with family and/or friends.
Hope that all your turkeys turn out perfectly and there are no accidents with a deep fryer.
And that no marshmallows catch fire when trying to heat up the sweet potatoes.

China Glaze - Sugar Plums
Sinful Colors - Lets Meet, Exotic Green

Tuesday, November 26, 2013

stud-ly

Studs in a line.  That sentence has so many different interpretations, yikes.
I love these micro studs.  They are very tiny yet easy to work with.  They are also relatively flat so they don't stick up to much on the nail.  They work with everything.  I went with a grey & silver theme for this paint job.  Just a silver accent nail & darker grey base color on the rest.  Dot on some silver studs, a clear top coat, done.  Very easy as long as you have a steady hand to apply the studs.

Sinful Colors - Smokin
Sally Hansen - Celeb City

Sunday, November 24, 2013

purple

Grey polish might be the trend this fall, but I do love a light purple polish.  I have a bunch of purple polishes.  I will do some grey paint jobs, but for now, I'll stick with purple.
This style of paint job I have done tons of times before.  It is quick and easy.  Apply your color base (1-3 coats depending on the polish coverage).  Let dry a bit.  Apply the glitter jelly polish in a line right at the tip of the nail.  Then brush from the middle of the nail down to fan out the jelly polish.  Apply a top coat & let dry.  Easy.

OPI - You're Such A BudaPest
Sinful Colors - Ice Dream

Thursday, November 21, 2013

matte purple

I have found a new favorite - matte top coat over glitter polish!  Sounds odd I know.  But there is something about taking away the overall shine that lets the glitter shine bright.  Nothing fancy about this paint job, just a glitter gradient tip.  But top it with the matte finish and it becomes really subtle and fun.
The only real difference with this paint job is a matte top coat is not quick drying, not at all.

OPI - You're Such A BudaPest, Polka.com

Tuesday, November 19, 2013

simple

A simple paint job that is impossible to photograph.  This polish (not the glitter halo polish) does not photograph at all.  I tried all different lights and three different cameras.  Nada!
It does look great in the photos though.  It is one of those colors that changes when viewed from different angles.  Then, to make it even more confusing, it looks totally different on than it does in the bottle.  But I do like it.  Then add a full halo and halo gradient nail and BAM, simple paint job.

Sinful Colors - Let Me Go
Urban Outfitters - Afterhours

Saturday, November 16, 2013

bow tie

I have always wanted to try a bow tie decal but the thick and/or 3D ones always seemed too odd for me.  Like they would catch on everything.  But then I got some vinyl decals, perfect! They lay flat on the nail.
Another paint job where I wish I had swapped the colors.  The grey of the bow tie looked a bit darker on the sheet.  I added a rhinestone in the middle for some pop.  I like the look but I need to find a better color for under the grey bow tie.

Nicole - Stand By Your Manny
MAC - Ming Blue

Tuesday, November 12, 2013

purple profile

Another great decal from makeitstickdesigns.com.  The reverse of the polish would have been better.  The white decal would have really popped on the darker purple.  But I was going for a dark paint job.
I love these decals.  I have said it before, but I will say it again, they are super easy to use and apply.  They peel off the sheet very easy with tweezers.  They hold their shape so no fussing once they go on the nail.  Just pat down the sides if your nails have a little curve to them.  A coat or two of top coat and that is it.  They make tons and tons of different decals.  Plus, most of them can come in a crazy amount of colors.  Each sheet also comes with a variety of sizes which is perfect for different size nails.

OPI - Vant To Bite My Neck?, Do You Lilac It?

Saturday, November 9, 2013

flip flop

Another gradient with silver.  I like it, especially the silver with a polish that has no sparkle.  With the silver on the tips it really accentuates the length of my nails.
Then add a quick row of dots in the two polish colors.  Nothing fancy but I like the look.  This would also be great with a pure black and white look.  Very geometric and simple.

Wet & Wild - On A Trip
Sally Hansen - Celeb City

Wednesday, November 6, 2013

pretty pretty princess

Princess nails.  Maybe not a real modern princess but these are sparkly and on the pink side.  Plus the base color is Princesses Rule!.
A very easy paint job.  Just a base coat (or three) on the non accent nail.  Then toss on some pink halo polish on the accent nail and a bit on the tips.
Tons and tons of glitter!!  But micro glitter so it shines in all lights.  I realize I do this look a lot (glitter tips) but I really like it.  It works with almost any color polish.  It is also great for a thinner polish because the glitter tips help hid the nail tip.

OPI - Princesses Rule!
Urban Outfitters - After Hours

Sunday, November 3, 2013

feathers

I tried a real feather paint job a while ago and it was awful.  It just looked bad (think one of the Pintrest Fail memes).  But I have two great bags of feathers that I see every time I open the drawer to get out my stamping plates.
This time I took my time.  I did just the feathers first, the the normal nails once the feathers were dry.  I also went with a clear base color.  It looks a little odd but it works.  I really like the blue feather nail.  It is very clearly a feather.  Now I have gotten better with the feathers, I think I can try one over a colored base polish.
I thought a full paint job of just feathers would be a bit much, especially with the bright (aka fake) feathers).  So I book-ended it with a bright pink.  I like it.  Very simple.

**UPDATED**
The yellow and purple feathers lasted all of 12 hour.  I still liked the blue, so I cleaned up the two naked nails and painted it the same pink polish on the thumb and pinky.
I really like it.  It would have looked awesome with a pink jelly glitter polish under the feather, or even a very light pink.  But overall, this one feather nail paint job looks better than more feathers.
OPI - Koala Beary

Thursday, October 31, 2013

glow-n-the-dark

Time to bust out the super toxic glow-in-the-dark polishes!  It is super hot pink (think hi-lighter) when it is under light.  Just looks like a normal paint job.  But in a super dark place . . .
It is just fun!  It is wicked toxic (not 3-free at all) but I figure once a year is not that bad.

Sunday, October 27, 2013

halloween swirl

I have always wanted to try a water marble but the mess and daunting clean up have kept me away.  Enter the toothpick!  It doesn't have the clean grandness of a perfect water marble but it does have a fun swirl and marble.
It is very easy and rather fun.  It just takes a little bit longer to dry.  But I would rather wait an extra 5-10 minutes of dry time vs dousing my cuticles in acetone to remove the overage.
So how was this done?  Just lay down the base coat (clear) and let dry.  Figure out which colors you want to use (I used four - two orange and two black) and open all of them so they are easy to access.  One finger at a time -  paint the base coat with any of the four polishes. Quickly drop a couple of drops of polish on the nail of the different colors (1 drop of each, at least two colors).  The more colors, the smaller the drops.  The smaller the nail, the smaller the drops.  Quickly use a toothpick and swirl the polish around.  The polish will be on the thicker side so it needs to dry a bit before even applying the top coat.

I am so happy the way this turned out.  I am definitely going to be trying this method again with some other colors.

OPI - Deutch You Want Me Baby?
Sinful Colors - Courtney Orange, Secret Admirer, Black on Black

Thursday, October 24, 2013

grays

Super easy paint job!  It still fits with this time of year since it is getting dark so early now.  Just five different polishes, then top with a large silver stud.
The pointer finger polish is a bit on the blue side but does still work overall.  It also would have been too big of a hue jump between the middle finger gray and the black.

I always forget how much I like these studs.  They are large but they are very thin.  Somehow they don't stick out too much even on the curved nails.  They are also large enough to make a statement.

Sinful Colors - Cool Gray, Black on Black, Jungle Trail, Smokin
Sally Hansen - White On

Monday, October 21, 2013

fall gradient

It's fall!!  I have to sweep my deck everyday because of all the leafs.  It feels like midnight when it is only 8pm (I miss sunshine).  Time to bust out the fall colors.
Another quick glitter gradient.  A deep orange (burnt umber-ish) with a bronze/gold glitter on the tips.  Nothing fancy.  It looked a little odd when I first applied it.  The orange just does not work my skin tone.  But the gold really helps tone it down.

OPI - Deutsch You Want Me Baby?
Sinful Colors - All About You

Saturday, October 19, 2013

candy corn

It's that time of year, the time of year when candy corn is everywhere.  I never buy any but some always ends up in my house.  I actually don't mind candy corn (the fall corn that has a hint of chocolate flavor is best) but can only eat about 5 pieces at a time.
It might not be the best of the holiday candy but it does make for a great paint job.  I actually bought this orange and yellow polish for exactly this paint job (last year though).  You could make this paint job neat and tidy by using tape.  Since my nails are all so different in size, tape would have taken forever.  I found an easier solution.  Base coat the entire nail white.  Paint the bottom yellow, top white again.  The middle doesn't have to be clean or neat because it will be covered by the orange.  Then just swipe the orange polish over the middle, top with a clear coat and it's done.

Sally Hansen - Mellow Yellow, White On, Sun Kissed

Thursday, October 17, 2013

ghost eyes

Besides the obvious candy corn paint job, I love crazy ghost eye paint jobs this time of year.  It is  spooky (G rated) but cute enough for every day. Just realized how many lines I have on my hands/fingers.  Yikes, no amount of lotion/cuticle oil will make them go away, it's always been this way.  It's always has and will annoy me.
Usually it is over a black paint job but I tried it over a deep red/purple.  I think it still works.  It was hard to get the red/purple to show up in a photo.  In normal natural light it appears as it does in the top photo.

This is such a quick and easy paint job.  Just quick color base coats & let dry.  Then use a dotting tool (or end of a bobby pin) to make two large white dots.  Let dry a bit.  Then add black dots.  Let dry completely before applying a top coat.

OPI - Lincoln Park After Dark
Sinful Colors - Black on Black
Sally Hansen - White On

Tuesday, October 15, 2013

claws

Still long nails so I decided to go with a paint job that accents the length.  These remind me of something you would see on a female villain in a movie.
Just the normal paint job, but I added the square studs near the tips.  This really makes my nails look super long.  And oddly enough, with the studs at the tips, I am not fiddling with them.  When I have studs and/or rhinestones on my nails, I catch myself running my other fingers over them.

OPI - On Her Majesty's Secret Service

Tuesday, October 8, 2013

Pin Up

Pair this with some black stilettos with red soles and some red lipstick and its a look.  Again, my nails are still long so it looks a bit odd with the red polish.
I went with a silver base on the ring and pointer finger.  Then the red on the other three.  Two coats of a red & silver glitter polish on the pinky and ring.  Add some black vinyl decals on the pointer finger and it is a look.  Right after I applied the top coat to my nails, I remembered I have this great black jelly polish that has a lot of red glitter.  This would have been a great polish for this paint job.  It would have changed the over all look and made it much more of a night time look.

OPI - Gettin' Miss Piggy With It
Essie - A List
Sally Hansen - Celeb City

Saturday, October 5, 2013

blue dots

Dots, dots and more dots.  A simple light blue base coat & two rounds of blue dots.  Nothing fancy.
The light blue base color does have a micro pink glitter undertone which adds a bit a pop to it.  Strangely, I do like darker blue nails, but I am not sure if I am keen about the light blue.  Or at least this polish.

Sinful Colors - Cinderella, Why Not, Rain Storm